I'm copying some of the 'older' posts, which I wrote in the past two months, as they are a better fit for The Viscount Affect. I'm an author, too, and probably have bored stiff some of my readers with my rambling about bicycles, hence my starting this blog.

Recently, I bought a wheel, a rear wheel to be precise. Nothing exciting about that, I'd agree, but the main reason I bought it was because it has a Viscount hub. A hub that was as stiff as a grandmother's hip and could only be turned with some effort. Since I'm planning to learn the craft of wheel building, I decided it's a great purchase, for I can 'train' on it without doing too much damage. The rim needs a good clean and the spokes are rather tattered, but they've been stored--generously sprayed with GT 85--in a plastic bag over night; the nipples in vinegar. The latter are looking wonderful, the spokes need another night, this time in coke. I'm trying to save as many as I can, spokes can be expensive. I need 72 in total, which if roughly 72 pounds.
Okay, but that's just an aside. So the bike shop owner advised against buying the hub or wheel with the hub as he thought it's damaged, but I'm not one to give up easily, particularly not when it's a precious Viscount rear hub. Given that they're for a Viscount bicycle it's needless to say that they're the perfect fit. However, I knew I'd have my work cut out since the bearings were shot. I'm referring to the wonderful fight I had with the press-fit bottom bracket.
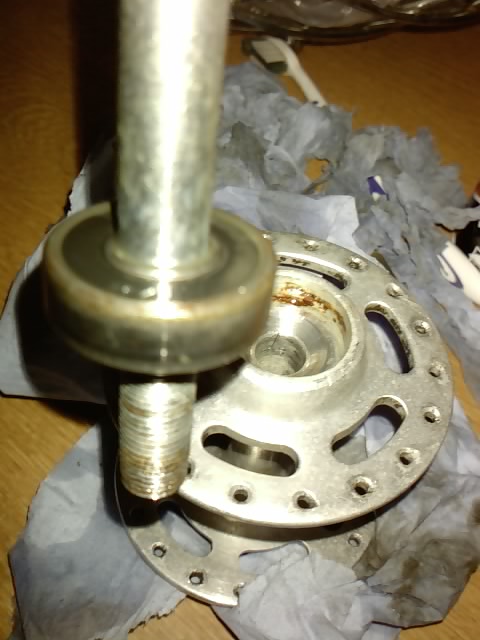
Yesterday, I decided it's time to take the wheel apart and, sitting on my sofa, tea to the left, spoke key in hand, wheel on my lap, and watching the latest Backstreet Boys video on YouTube, I dismantled the whole thing. When the hub was finally free, I went to the kitchen to try and get the axle out. Yep, that one wasn't a straightforward process but, believe it or not: I managed. And I'm dead proud about it. I mean I've never repaired a puncture in my life. All I had done in the past, is to change some brake pads or adjust the brakes.
Now I'm finding myself knee-deep in taking parts apart before putting them back together. And I love it. I feel like a kid again, when I dismantled music cassettes because they had band salad or were ripped; I fixed them and, despite of missing a tiny bit where the cello tape held the band together, I was able to play my favourite music. Just that the objects I'm working on are a little bigger and require more tools and complex thinking--mostly outside the box.
 |
| Shot bearings |
 | ||||
| A deja vu and a rusty hub shell |
Then I tried to get to the bearing from inside (from the other side of the hub) by sticking a screw driver through it and gently tap it out. No success. Okay, I had hit my hand and really wanted this damn thing out!
 |
| Beautiful, but not quite there yet. |

 |
| Apparently, a wonder grease. |
It came right in time, as I can't wait to put Shawn's BB back together and ride him again. I will need to clean the crankset and pedals, too. And I think at the weekend, I'll give my first wheel a go. It means the evenings spent with YouTube videos on 3-cross-method of wheel building. Unfortunately, I wasn't as lucky getting the other bearing off the axle; for the lack of a bearing puller, I used a hammer (I know it's wrong and am paying the price for my impatience), and have somehow ruined the threading at both ends. I'll have to find a someone who can 'restore' them as I'd like to keep the axle. Apart from that I'm pretty happy about the outcome.
Added: It seems my method of 'gently sanding the rust away' was a mistake. Someone very knowledgeable warned off to not do it, but it was too late, the damage was already done. I've just put the bearings back in. A little bit of grease and a few gentle taps and they were in. It's not supposed to be that easy. Guess this is a case of trial and error. An upsetting error at that.
No comments:
Post a Comment